With its diverse landscapes and enchanting nature, the Portuguese island of Madeira is a fantastic place for an active family vacation. However, these same captivating landscapes are often cliffside, with dramatic inclines, steep drop-offs, and narrow paths.
My family and I spent ten months on Madeira, exploring trails on the weekends and going on short hikes in the North during the week. After talking to some other moms online, I decided to list our favorite baby-friendly hikes on Madeira – and it was an absolute hit. Since then, we’ve explored more trails, parks, and nature reserves. These are five more absolutely baby-friendly hikes on Madeira.
Criteria For a Family-Friendly Hike
Before I walk you through our favorite hikes (pun intended), I’d like to share our criteria for calling a hike family-friendly.
- Safe – Although hiking carries an inherent risk with it, these trails are safer than most on Madeira. This means the path is wide, and the dropoffs are fenced off.
- Accessible – These trails are located near a parking lot, meaning you won’t have to trek for hours to start a hike.
- Flat – Madeira is not flat. These trails don’t have long, hard climbs, or steep drops.
- Tested – These are all trails we’ve hiked personally, not ones we’ve read about.
PR 10 Levada Do Furado
Located in Ribiero Frio, the Levada Do Furado is one of the oldest public levadas on the island. At 11 km, it’s a long trek. We only hiked 2 km in and turned around to head back to our car. This meant we stayed on the flat part of the hike. We didn’t have to go down a single step!
The part we hiked along was wide enough for a stroller, and without steep drop-offs. I still wouldn’t recommend hiking in Madeira with a stroller. Levadas can become skinny very quickly. Plus, there tend to be a lot of stones and exposed tree roots along the path, making it a bumpy ride.
I prefer hiking with a carrier and allowing older children to walk.

The Levada do Furado passes through the Ribiero Frio valley and shows you beautiful farmlands, and jaw-dropping viewpoints of the Penha D’Aguia rock formation. We’ve talked to other hikers who arranged transportation to and from the hike. They start in Ribiero Frio and hike to Portela, where their taxi driver waits for them in the Restaurant Portela a Vista.
Cold Hard Facts
Distance: 11 km / 22 km
Difficulty: Moderate
Duration: 5 hours / 10 Hours
Trail Type: One Way / Out-And-Back
Start/End: ER 303 (Ribeiro Frio) / E.R. 102 (Portela)
Max. Altitude / Min. Altitude: 880 m / 645 m
Attention: This Levada is currently closed (April 2024).
PR 22 Vereda Do Chão dos Louros
We stumbled across this path accidentally – it’s located on the road connecting Sao Vicente with the south through Encumeada. Nestled in between impressive mountains, Chão Dos Louros is one of my family’s favorite hikes. It’s flat and easy, but it makes us feel deep in the mountains, although the hike is rarely far from the street.

The hike starts and ends in a park with barbecue stations. On holidays and weekends, Madeirans quickly take over these spots to celebrate birthdays and anniversaries or simply enjoy a nice meal with their family. Our very friendly baby loves exploring the park on the weekends – he goes up to every group and begs for something delicious from them!
This hike is easily combined with a trip to Sao Vicente – the trailhead is located above the tunnel that connects the North and South of the island.
Something to keep in mind before coming here: The weather.
Madeiran weather is finicky, at best, and this trail is in the mountains. It can be up to 5°C (41°F) colder up in the mountains than at lower altitudes. That’s why you should alway bring an extra layer with you in Madeira!
Cold Hard Facts
Distance: 1.9 km
Difficulty: Easy
Trail Type: Loop
Duration: 45 minutes without kids
Start/End: Chão dos Louros / Chão dos Louros
Max. Altitude / Min. Altitude: 890 m / 830 m
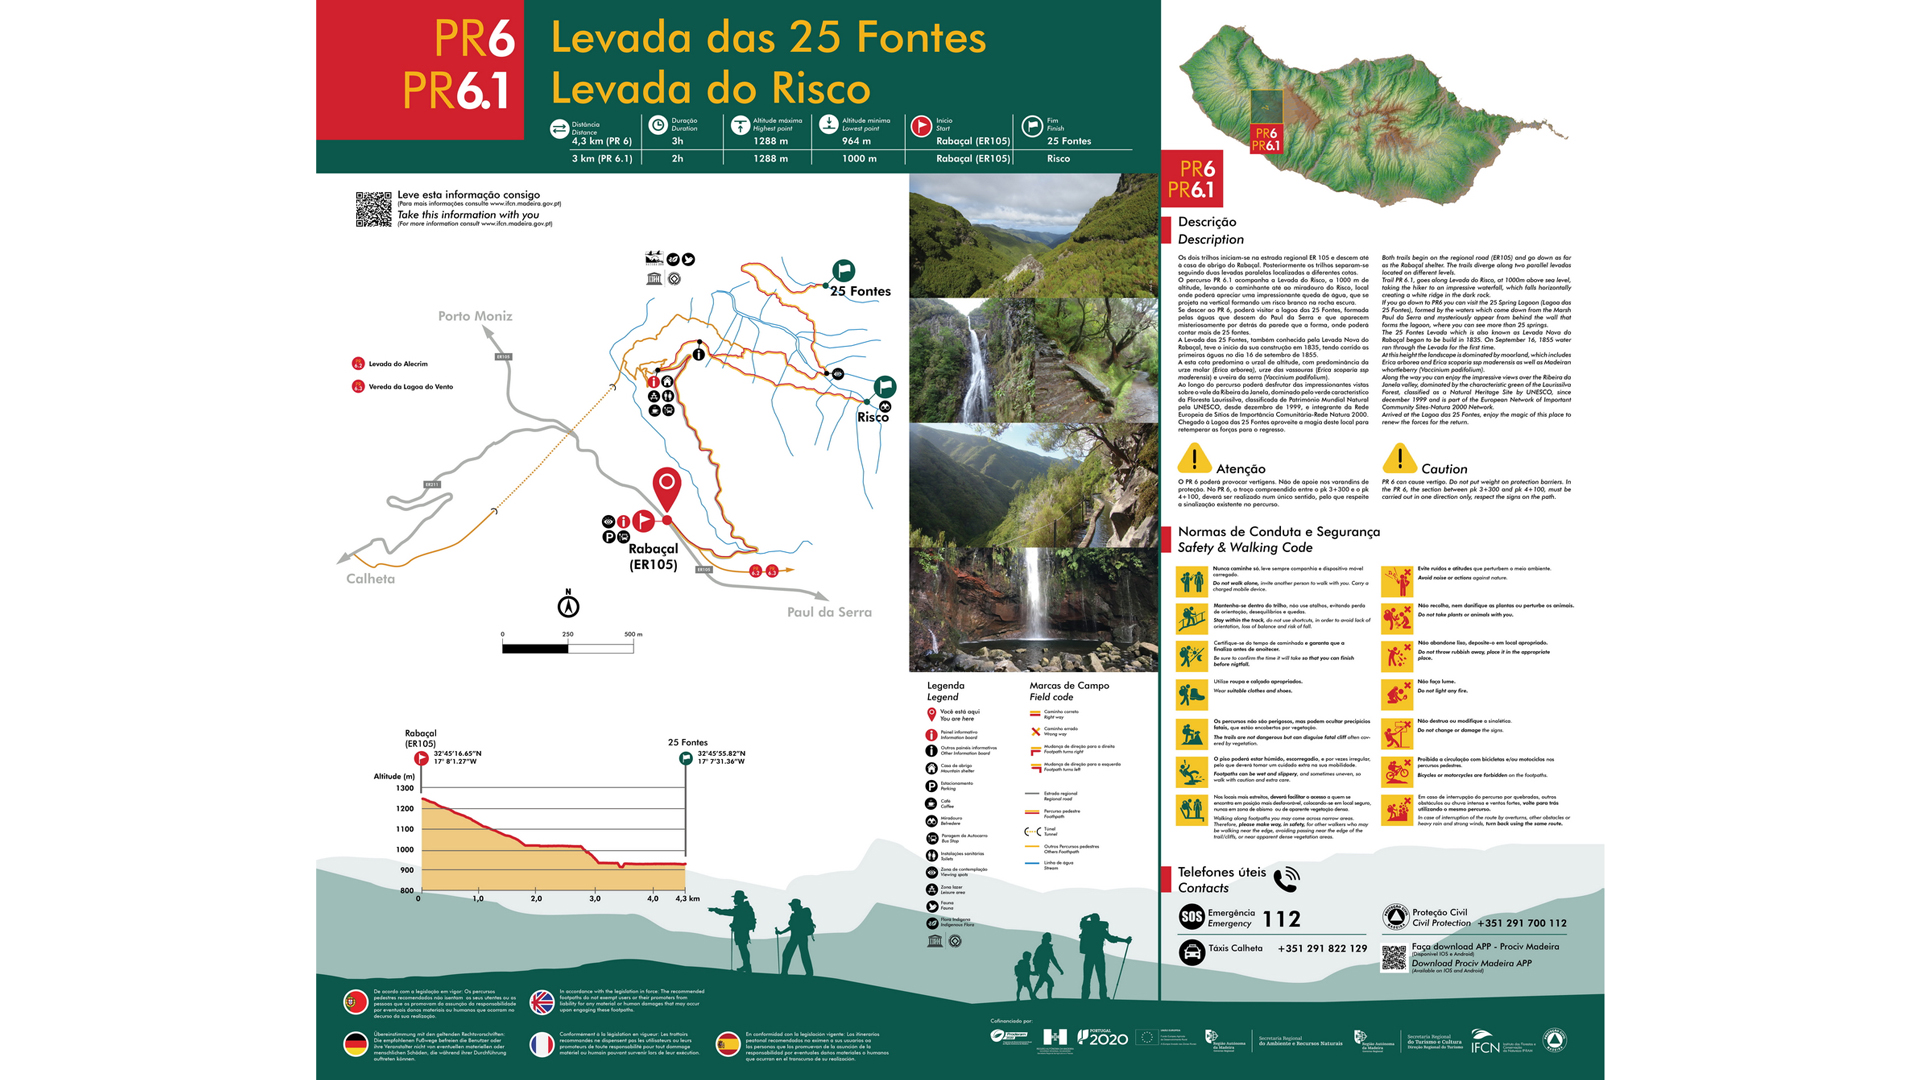
PR 6.2 Levada Do Alecrim
I’m not a fan of the 25 Fontes Hike. There, I said it. I find it to be underwhelming, overfilled, and not very relaxing. If you’re willing to miss out on some of the more famous hikes to find something better, then Levada Do Alecrim is for you. You can find this hike in two spots, either by parking at the same parking lot for 25 Fontes, or by parking in a natural preserve near Jungle Rain.
Just because Levada Do Alecrim doesn’t have 25 Waterfalls in its name does not mean it isn’t impressive. During our hike along the Levada, we counted over 27 small and four large waterfalls. There were at least three excellent swimming holes, and the beginning of our hike was flat and on a wide enough trail to allow the baby to roam free.

My absolute favorite part about this hike is how easily adaptable it is. Advanced (and motivated) hikers can add Lagoa Do Vento into their trail. Those of you unwilling to miss out on parts of the 25 Fontes hike can easily add a detour to the Rabacal or Levada Do Risco into the end of the hike. And hikers who are tired by the end of the hike can take the Calheta Shuttle bus back up to the parking lot.

Cold Hard Facts
Distance: 3.5 km (7 km round trip)
Difficulty: Easy
Duration: 2:30 hours without kids.
Type Of Trail: Out-And-Back (Loop Possible)
Start/End: Rabaçal (E.R. 105) / Water spring of Levada do Alecrim (Lagoa ‘Dona Beja’)
Max. Altitude / Min. Altitude: 1339 m / 1256 m
PR 18 Levada Do Rei
This is hands-down my favorite Levada. It’s also the first Levada walk I ever completed! We live close to the Levada Do Rei; if I need a workout in the woods, we go here. There is even an option to create a small loop at this hike if you’re like me and hate the repetitiveness of an out-and-back hike.

Located next to the aptly named Quinta Levada Do Rei in Sao Jorge, Levada Do Rei takes hikers through an exotic forest alongside a levada. You’ll be able to catch glimpses of Santana, the ocean, Pico Ruivo, and tons of amazing waterfalls along your hike. Keep your eyes on the trees, especially near the beginning – if you’re hiking in April and May, you may luck out and be able to harvest some Banana Maracujas, native to Brazil.
The trail itself is flat and wide. A few narrow parts are throughout, but a fence protects the steep drop-offs. If you get nervous, you can always hop in the levada and hike with wet feet!
The hike feels like it ends abruptly. After kilometers alongside the levada, you’ll come into a forest and walk alongside a river. Keep on the path until you reach a small clearing, spotted with boulders and populated by Madeiran birds. If you’ve got any snacks leftover on your hike, share some with the birds – they’ll eat right out of your hands!
Baby loved climbing around the rocks at the end of our hike. Somehow, I ended up deleting all the photos from the day he and I hiked the Levada solo – I guess we’ll have to do it again!

One thing I need to mention about this hike is that it’s long. The beginning is flat and wide, meaning your kids can walk themselves, but towards the end, the trail becomes skinnier. We’ve hiked this levada three times and finished it only once – because our baby was melting down, and we didn’t see the point in pushing through. The end is worth the effort, but I’m a fan of knowing our limits and listening to our intuition. If we think it’s time to turn around, we turn around.
Cold Hard Facts
Distance: 5.3 km (10.6 km round trip)
Difficulty: Moderate
Duration: 3:30 hours without kids
Trail Type: Out-And-Back (Loop Possible at End/Beginning)
Start/End: São Jorge Wastewater Treatment Plant / Ribeiro Bonito
Max. Altitude / Min. Altitude: 573 m / 535 m
Boa Ventura to Arco de Sao Jorge
This is not technically a trail, but one of my family’s favorite nature hangouts. There are several ways to get to our “secret” spot, so I’ll explain both of them here. A word of warning: This trail is dangerous at the beginning and end. It goes along a steep cliff. It’s only on this blog because there is more than enough flat space to keep your family safe, and the creek it leads to has an incredible swimming hole.
Sao Cristovao

The yummiest way to get to the creek is by parking your car at the restaurant, Sao Cristovao. If you park your car here, eat something from the restaurant after your hike. The food is delicious; the waitstaff, owner, and cooks are all Boa Venturans, they’ve got tons of insider tips about this part of the island.
Their food is fantastic, authentic, and delicious!
After parking your car behind the restaurant (and enjoying the amazing view) it’s time to get sweaty. Follow the small unpaved trail on the right side of the paved driveway behind the restaurant. If you’re unsure where to go, ask at the restaurant. Although they don’t always like people parking and hiking without eating, they’re friendly to a fault and will tell you where to go. If you’ve got the time (and the kids aren’t melting down) grab a coffee before you head out.
After a couple of minutes, the small trail turns into a stone path that goes down the mountain. This path actually used to be the road connecting Boa Ventura with the town of Arco de Sao Jorge – which explains the insanely muscular calves of our neighbors!

After crossing over a bridge and heading slightly uphill, you’ll come to a four-way fork in the path. Turn left (towards the ocean) to find our secret spot! This path takes you directly to the cliffs above the sea, so I recommend holding onto your kids tightly.
From here on out, the two trails combine into one, so the directions will be the same.

Once you’ve tired of the cliffs, it’s time to find the next part of the trail. It’s a small footpath leading down the mountain and away from the cliffs. This path brings you through the ruins of an old miller’s village, complete with three to four crumbly houses.
After going downstairs for a couple of minutes, the path forks again. If you keep straight, you’ll come to an old cave house. However, the path is after the cave house has been eroded by the waves and is dangerous to climb down.
If you want to see our secret spot, turn left at the fork and head down the path. Eventually, the path will bring you into a clearing underneath a stunning sweetgum tree. This is the spot!
We spend hours in this spot, climbing around on the tree, throwing rocks in the creek, eating picnic lunches, and swimming (when it’s warm enough).
If you turn right after going under the tree, you’ll even be able to walk along the river to the ocean. Just be careful – the waves on the North Side of Madeira can be unexpectedly large, rough, and the undertow is real.
Don’t attempt to swim in the ocean here, especially with kids. There are drowning victims every year.

Caminho Da Entrosa
The easiest and quickest way to get to the creek is by parking your car on the Caminho Da Entrosa.
You can easily combine this hike with a stop at the Terra Bona Vineyards, or better yet, book a night in their incredibly luxurious villas, complete with a swimming pool, panoramic views of the prettiest part of the island, and a hamam.
Once you’ve reached the end of the road, stay straight on the footpath. There will be a stone path going up and down the mountain. To get to our secret spot, keep straight. Eventually, the path will bring you to the cliff with an AMAZING view of the ocean and the two Ilheu’s (small rocky cliffs). If it’s a wavy day, enjoy the views of the waves crashing against the rocks.
Hold on to your kids; there are NO railings or safety measures to prevent deadly falls. Once you’ve tired of these cliffs, head down the small trail that goes into the woods on your left (when facing the restaurant Sao Cristovao) and your right when facing the mountain.


Keep on this trail until it forks, and turn left. If you keep straight, you’ll come to a small cave house with steps down to the ocean, but these steps have been eroded and are dangerous to climb down.

After walking down the trail for another five minutes, you’ll find yourself underneath a gorgeous sweet gum tree. This is the spot! We spend hours climbing the tree, climbing over the rocks, and swimming in the creek. My baby loves walking along the river bed and throwing rocks into the creek, and my husband and I use the tree as our personal pull-up gym.
Cold Hard Facts
Distance: 1 km
Difficulty: Moderate
Duration: 45 minutes walking
Trail Type: Out-And-Back
Start/End: Boa Ventura
Max. Altitude / Min. Altitude: 50 Meters /0 Meters
Before Hiking In Madeira
Check Weather Conditions
The weather in Madeira is ever-changing. Make sure the conditions are right for a hike before setting off on the road. We use Windy to check the weather; its 50+ interfaces mean I always know what’s coming our way.
Try to avoid particularly long, high-altitude, or strenuous hikes on cloudy days or after a hard rainstorm, as the trails can become foggy, washed out, and difficult to navigate. Check the Proteção Civil for weather warnings.
Download the ProCiv App
For a further layer of protection, download the ProCiv App. This app sends you weather warnings directly, an allows you to easily contact emergency services in case you get lost or injured.
Here’s the link for Apple Users
Here’s the link for Android
Wear the Proper Attire
Everytime we go hiking, there’s at least one tourist who came wholly unprepared for this hike. They usually wear white sneakers or sandals with a skirt or chinos. Don’t be this person.
These people generally don’t make it far on the hike; they slip, walk slowly and carefully, and don’t enjoy themselves at all.
You don’t need the best, most expensive, most advanced hiking equipment for these hikes, but I strongly recommend either trail runners or hiking boots, shorts (or zip pants), a comfy shirt, and an insulating layer. If you have weak knees, like me, grab a knee brace or hiking poles for an additional layer of security.
Decathalon in Funchal has everything you need if you forget your hiking boots. They also allow you to order bulky camping or hiking equipment in advance for pick-up.
Follow Basic Hiking Safety Protocols
As always when hiking, make sure to follow basic safety protocols. I have a far more extensive blog on these here.
There aren’t always restaurants or faucets on hikes, especially on the longer, more natural ones, so make sure to prepare.
- Pack enough snacks and drinks to get your family through the hike and still have leftovers.
- Stay on the trail
- Tell someone where you’re going and when you expect to be back
- Bring a source of light, an emergency blanket, a first-aid kit, and a map.
Enjoy!
My family had a blast during the 10 months we spent on Madeira hiking and seeing all the sights. These trails are fun – don’t let my warnings stop you from getting out and exploring!
Madeira is steep, mountainous, and filled with surprises. After nine months of full-time exploration, a wrong turn led us to a surprisingly beautiful valley, where we found our favorite hike.
Where’s your favorite part of the island?


Leave a Reply